


Sending Data with MQTT on the SAP IoT Service Cockpit
The Internet of Things (IoT) service built on SAP’s Cloud Platform provides an effective initial framework for integrating your IoT devices into the SAP Landscape. We’ve created this guide to help you connect to the service and send messages through it. This tutorial will walk you through how to fully create an IoT Device on the SAP Cloud Platform, and connect it to a client to allow a data transfer. Hopefully, by following our steps outlined in this guide, you can create a fake IoT device on the SAP Cloud Platform, connect it to an MQTT Broker client, and then transfer data from the device to that client.
Before beginning, you’ll need to enable the SAP IoT service. If you have all the correct pre-requisites, you can proceed with the process below.
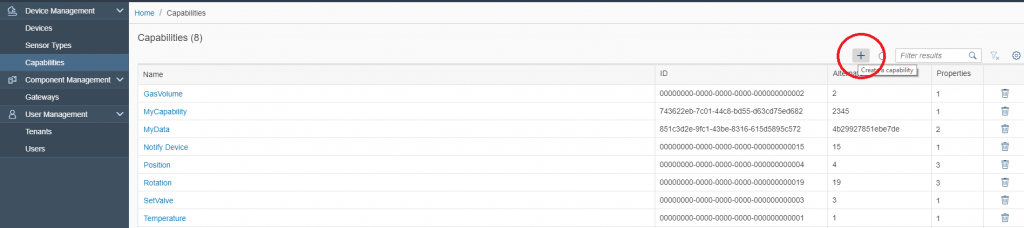
Create a Capability
Navigate to Capabilities section of the Device Management category. Choose + (Create a capability) above the capabilities list.
Under General Information, insert a Name and an Alternate ID (make note of the Alternate ID as you’ll need it later). Then, under Properties, enter a Name, Data Type, and Unit of Measure (Celsius, psi, etc.). Click “Create” and a message should appear letting you know the Capability was created successfully.
Create a Sensor Type
Navigate to the Sensor Types section of the Device Management category. Choose + (Add a Sensor Type) above the Sensor Type list.
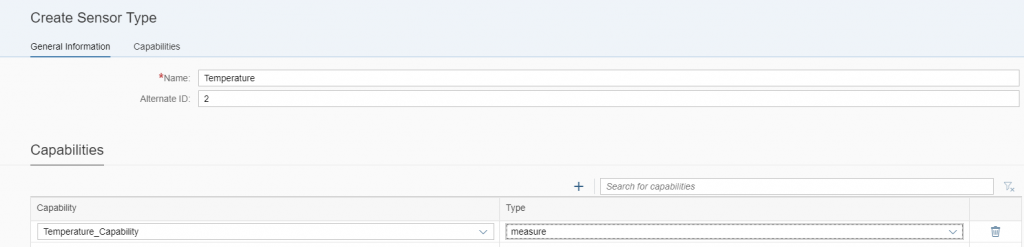
Under General Information, insert a Name and an Alternate ID (make note of this Alternate ID). Then, in the Capabilities Section, select the previously created Capability from the dropdown box as well as the Type in the other dropdown box. Click “Create” and a message should appear to let you know the Sensor Type was created successful.
Create an MQTT Device
Navigate to the Devices section of the Device Management category. Choose + (Create a device) above the devices list.

Under General Information, insert a Name, a Gateway (MQTT), and an Alternate ID (make note of this Alternate ID). Click “Create” and a message should appear letting you know the Device was created successfully.
Create a Sensor
Navigate to the Devices Section of the Device Management category, select the previously created device. In the Sensors section, choose + (Add a sensor) to add a new sensor.
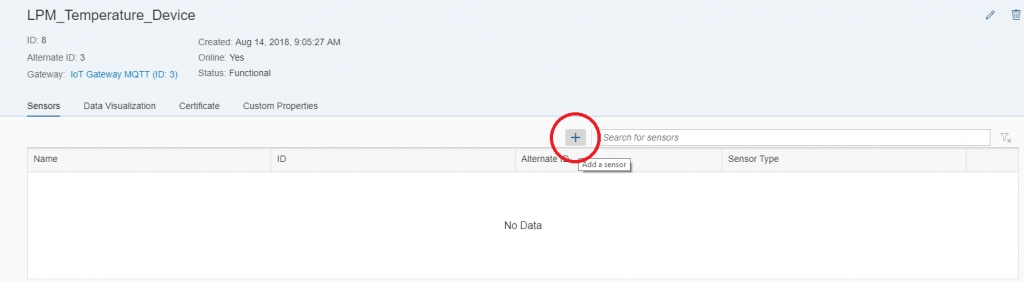
Under General Information, insert a Name, select the previously created Sensor Type, and enter an Alternate ID (make note of this Alternate ID). Click “Add” and a message should appear letting you know the sensor was created successfully.
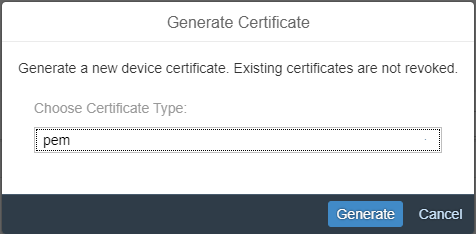
Generate Device Certificate
Navigate to the Devices section of the Device Management category and choose the previously created device. Click the Generate Certificate button and choose PEM. A .pem file should download.
Select and copy the secret key that appears in the dialog box. It’s important that you store the key somewhere you can easily access it. Rename the file “certificate.pem.” Using Command Prompt, open OpenSSL in the directory where your .pem file is located and enter:
‘pkcs12 -export -in ‘Path to certificate.pem file’ -inkey ‘Path to certificate.pem file’ -out ‘Path to where you want to resulting .ks file to go’
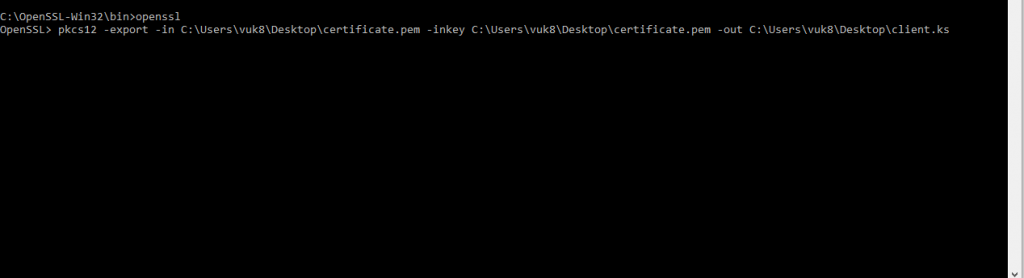
*Use the secret key for all of the password requests that will come up.
Publish Data Using the Paho Client
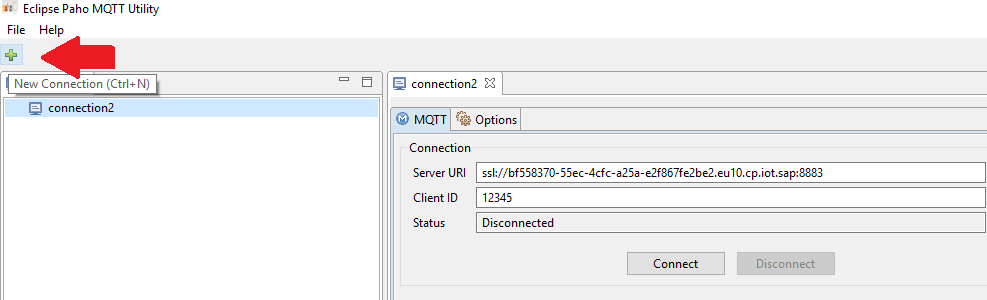
Make sure you have the Paho Client installed on your device. A download can be found here. A ZIP archive should download. Extract it to a folder of your choice. Launch the Paho client.

Click the + to create a new connection.
Choose the Options tab of the connection. Enable the checkbox labeled Enable SSL. Choose browse for the Key Store Location and choose the client.ks previously downloaded (you may have to change the file type to “.” in the selection menu). Use the Secret Key for the Key Store Password.
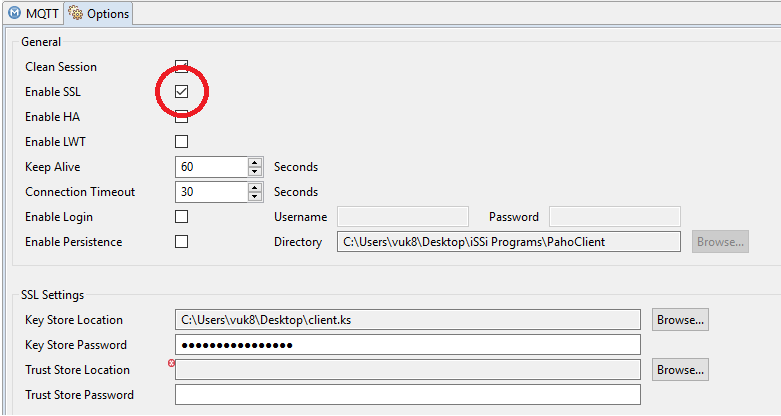
Choose browse for the Trust Store Location and choose the “/jre/lib/security/cacerts” of your local Java installation folder (Note: you may have to change the file type to “.” In the selection menu). Set the Trust Store Password to changeit.

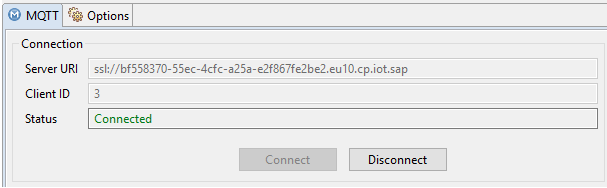
Choose the MQTT tab of the connection. Add the Server URI as follows: ssl://<HOST_NAME>:8883. Add the Client ID as the Alternate ID of the device you wish to connect. Click Connect.
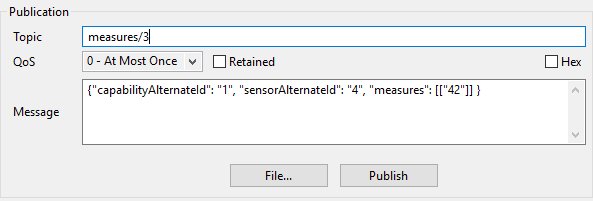
Enter the Message you wish to publish in the Publication section.
![]()
Choose Publish and a message is sent to the Internet of Things Service.
By now, you should have a firm grasp on implementing MQTT on the HANA Cloud Platform. We hope you found this guide helpful in kick-starting your discovery of IoT’s potential in your system landscape. We’d love to hear your feedback. Please comment down below. If you have any further questions or need help executing your SAP implementations, please don’t hesitate to get in touch with us directly.

Thomas Rautenbach, Architect
Thomas Rautenbach has over 20 years of diverse systems experience with a strong focus on system and integration architecture and software design and development. He has detailed technical, functional and system knowledge across the SAP technology platform, including extensive experience with the Finance, Supply Chain, Sales and Distribution, and Human Resources modules.
Connect with Thomas on LinkedIn

Follow iSSi on LinkedIn
![]()


